Wednesday, August 31, 2011

Peach Cake with Pecans

Ramadan just ended here in Istanbul and the end is always celebrated with a gathering of family where lots of food is served. 
We are celebrating Bayram, or the holiday, at my grandmother's house today. I wanted to bake her something as she just got out of the hospital and I love to contribute to occasions like this. She is pre-diabetic however, so I knew it had to be sugar-free. Instead of relying on one of my old standbys like banana bread or cheesecake, I thought I would try this peach cake by my favorite TV chef of all time, Ina Garten (The Barefoot Contessa). That way I would get to utilize the great fresh summer peaches in season right now as well. 
Unfortunately, I failed to notice beforehand that the sugar is used to caramelize the peaches, so half-way through, I had to scrap making the diabetic version and start over because diabetic sugar doesn't caramelize. It burns. And I hate it. The diabetic sugar won the battle, but the war isn't over! 


I started over and used normal sugar the second time around. The cake turned out beautifully. You see, this cake calls for a layer of peaches sprinkled with sugar and cinnamon in the center of the cake, as well as a layer of peaches on top, with the addition of pecans. The peach layer in the center is delicious and adds just the right amount of creaminess

Before baking. 
I would strongly recommend this recipe if you are invited to a brunch one day or even as a lighter summer dessert. It's not light calorie-wise, but the fact that it includes summer peaches makes you feel a little less guilty about indulging. After all, there's fruit inside! 


I didn't make any changes to the recipe except for one:
- They don't sell sour cream in Istanbul (or I couldn't find it), so I used strained Turkish yogurt(süzme yoğurt) instead. I think it might have been a little thicker than sour cream, but it did the job. 

Note: Watch this cake carefully as the pecans on top tend to brown quickly and you don't want them to burn, as mine sort of did. I did cover the cake with foil once the top had sufficiently browned. 

Saturday, August 27, 2011

Mascarpone Cheesecake with Almond Crust

My boyfriend is a bona fide dessert person. He loves chocolatey things, pain au chocolat, banana bread, ice cream and pretty much everything in between. 


I, on the other hand, don't have a sweet tooth whatsoever. Hand me a bowl of yogurt and garlic Lays (a flavor sold here in Turkey, I swear they're delicious) and a bag of M&Ms and the chips will be gone within 20 minutes and the chocolate will remain intact. 


I do love to bake though so it works out quite nicely. I have someone to cook for and he gets all the diabetic treats he can handle. 


I've mentioned the difficulties of baking with diabetic sugar before here, but one recipe that turns out exactly the same no matter the substitution is cheesecake. Cheesecake was my boyfriend's baking request before I depart for NYC on Monday- that is, if Irene allows it. 


The yolk suspended between beaters. 
I usually use this recipe, which is foolproof and delicious. If you haven't checked out AllRecipes before, you should. One of the best things about it is that you can read through all the comments users have made in deciding if you want to bake something. It comes in handy when you need to make an ingredient substitution or don't know what a certain technique is. 


This time around, I wanted to use mascarpone, which I had purchased the other day at the market. You can't find high-quality cream cheese here and the brand I normally use isn't that great. However, you can find high-quality mascarpone and I figured it would make a nice addition, in place of some of the cream cheese. When I thought mascarpone + cheesecake the first person I thought of was Giada, the Italian-American Food Network chef and sure enough I found this awesome recipe. The best part is that the crust includes crushed almonds. Yum. 
Make sure crust has cooled. 


Changes to the recipe: 
1. I used sugar-free Turkish biscuits (Mavi Yesil) instead of the graham crackers. 
2. I used 1 cup diabetic sugar, instead of 1 1/4 cup normal sugar (diabetic sugar tends to be sweeter and thus you don't need as much). 
3. I didn't have enough mascarpone, so I used a little ricotta in place of what was missing. 
4. I didn't fill a pan with water as suggested, and rather just baked the cake normally. It took less time this way, so be careful. 


It browned a lil' too much. Still yum. 
Tip: It's hard to know when cheesecake is done because the inserting a toothpick trick doesn't work. Your best bet is turning off the oven when the center jiggles just a little when shaken. I always leave the cheesecake in the oven (turned off) once it is done. I read somewhere that cheesecake cracks if not allowed to cool down slowly. Seems to do the trick. 

Tuesday, August 23, 2011

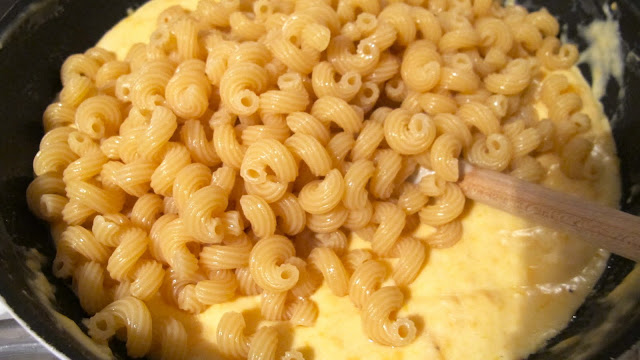
Martha's Mac 'n' Cheese

My roommate/BFF has been asking me to make her mac 'n' cheese for months now and I haven't gotten around to it. Nothing like an impending departure to make you finally get around to doing things you put on the back burner! 


Now I like fancy mac 'n' cheese. You know the kind with expensive, smelly cheeses instead of the traditional cheddar. I also like adding fun and healthy things like steamed broccoli into the mix. I'm not a huge fan of the traditional variety, but that's exactly what my friend wanted. Good ol' orange mac 'n' cheese with no bells or whistles. 


I decided on Martha Stewart's recipe found here, because all the reviews were glowing. I was also intrigued by the fact that she calls for sliced white bread, to be crumbled, mixed with butter and made into the crispy topping. Seemed like the exact recipe I was looking for. 


Last minute I opted to add all the cheddar into the white sauce and used the Parmesan exclusively for the top. This made the mac 'n' cheese super cheesy
White bread crumbled with butter for a crispy top.


A few notes:
- Be careful with the boiling milk; especially when pouring it into the butter mixture. I found this step a little tricky. 
- Definitely cover the mac 'n' cheese for the majority of the cooking time with aluminum foil, and uncover only for the last 10-15 minutes. You don't want the top to burn before the dish is done. 
- I opted for the cheddar/Parmesan combo but next time I'd like to try it with gruyere. It'll add a much needed maturity to the dish. 


We served this with a side salad, but honestly, no one was very interested in the salad! The mac 'n' cheese steals the show

Sunday, August 21, 2011

Green Goddess Dressing

The other day I was invited to a dinner party and was asked to make a salad and dessert. The dessert was not a success (it was a battle between me and the diabetic sugar, and the sugar won), but the salad dressing was definitely good enough to distract everyone
So delicious! 
I had been wanting to try making goddess dressing for a while. For those who don't know, goddess dressing was created in 1923 at the Palace Hotel in San Francisco (shout-out, hometown!) and usually consists of a combination of mayonnaise, sour cream, chives, parsley, tarragon, lemon juice, oil. 


I wanted to make a non-mayonnaise, healthier version and was pleased to find a recipe in the new book I've been perusing on my iPad ('1000 Vegan Recipes'). 


This dressing is so good that I actually had to leave the original batch at home with my sister and roommate (because they went nuts over it) and make another jar for the party. Before I left the house, I noticed my sister enjoying it with celery sticks; my roommate opted to spread some on a piece of bread and add a few slices of cheese on top. I can imagine this dressing spicing up many dishes. If you choose to keep it thicker, it's more like a dip. I watered it down a bit for the salad. 


Green Goddess Dressing
Taken from Robin Robertson's '1000 Vegan Recipes' 
Makes about 1 cup
2 garlic cloves
2 green onions
2 tablespoons fresh parsley
1 tablespoon fresh basil leaves
1 tablespoon chives
1/4 cup olive oil
1/4 cup tahini
2 tablespoons champagne vinegar
1 tablespoon lemon juice
salt
pepper


Just some of the ingredients. 
Blend all the ingredients in a food processor. Keeps for up to 3 days in the fridge. I substituted champagne vinegar for the tarragon vinegar, because I didn't have any on hand. 


This is one of the best dressings I have ever tasted! Even my roommate who usually doesn't like anything with more than 3 ingredients loved it. Try it tonight. You won't be disappointed! 

Thursday, August 18, 2011

Some-Kinda-Nut Burgers

I have to start this post off by saying I'm not happy with the photo of the burgers. It does not do justice to how yummy they actually were. So I apologize for that. 
I know- they look ridiculous. 
Now, there are few things I love more than veggie burgers. It's kind of a vegetarian/vegan cliche, but I always loved them even back when I ate meat, so it's fun to be able to make a really yummy cruelty-free version. 


The other day as I was browsing VegNews Magazine's website, I noticed a comment by one of the readers who said Robin Robertson was their favorite veggie cookbook author. I've always been obsessed with anything by Isa Chandra Moskowitz (if you haven't checked out her blog, head here), so I was a bit curious to see what I was missing. 


I downloaded '1000 Vegan Recipes' (I actually made it un-vegan, because I added an egg!) to my iPad and quickly decided on this nut burger. Unlike many veggie burgers, it's not tofu or bean based. It mostly consists of oats, carrots and nuts and is different, but really good. It's filling and goes great with a salad, and is super easy to make. 


Some-Kinda-Nut Burgers Recipe
Adapted from '1000 Vegan Recipes' by Robin Robertson
2 tablespoons plus 1 teaspoon olive oil
1 small onion, chopped
1 medium carrot, grated
1 cup mixed nuts
1 egg
1/2 cup old-fashioned oats
2 tablespoons peanut butter
2 tablespoons minced fresh parsley
1 tablespoon ground flaxseed
fresh ground pepper
The patty mixture before processing. 


Directions:
1. Heat the olive oil and saute the onions till soft. Stir in the carrot. 
2. Pulse the nuts until chopped in a food processor, and then add the onion-carrot mixture with the flour, oats, peanut butter, parsley and pepper. 
3. Break into patties and bake at 350°F for 15 minutes, flipping once, until brownish on top. 


I also made a simple white sauce to spread on top consisting of yogurt and tabasco. With a few jalapenos, these were a quick and filling dinner. 

Tuesday, August 16, 2011

How to: Roasted Beets

I've started this series of 'how to's and noticed the first two are both about roasting. However, roasting red bell peppers is very different from roasting beets, so I thought it might be helpful to some novice cooks. 
Look at those gorgeous babies!


Roasted beets are deeeeelish-ious! If you haven't tried them, you must (although if you haven't, you probably live under a rock, so you might not have access to them). I love them sliced over salad, or added to a veg sandwich. They go great with creamy white cheeses like goat cheese and feta. They love to be paired with a nice balsamic vinaigrette, too. 


A little disclaimer before I get to the directions: This is how I roast beets. It's not necessarily the exact perfect way to. I think I might even combine two methods, but the important thing is that it works. 


So here goes: 
Step 1: Remove the stems and wash the beets. Dry them thoroughly. Heat the oven to 400°F. 


Step 2: Cover the beets in olive oil and wrap them in aluminum foil, individually. 


Step 3: Place them in an oven-safe dish, with 2 inches of water in it. 


Step 4: Bake them until the beets give when poked with a knife. 


Step 5: After allowing to cool, remove the tougher skin with your hands under running water (the water will prevent your hands from getting stained red). The skins should slip off easily. 


Step 6: Enjoy! 

Zucchini Bread

If I don't start cooking from other blogs and books soon, I might just have to make this a 'Julie and Julia' style blog dedicated to recreating recipes from Smitten Kitchen


Do you like the bigger photos? 
Seriously, I have been cooking exclusively from Deb's blog for the past month. She has the most gorgeous photos I've ever seen on a food blog- even things I don't eat (meat) or like (asparagus), I want to eat! It's a testament to her photos as well as her writing. 


So when I was in Bodrum last week I made zucchini bread. My boyfriend is a huge fan of banana bread, and I make it on a regular basis for him. But I wanted to try something different; a sweet bread, that consisted of some veg, too. (Even though I am usually opposed to putting veg into things that usually don't feature them. I'm looking at you, black bean brownie!)


I have mixed feelings about this bread. The recipe was good and it turned out how it's supposed to, but I just wasn't feeling it as much as banana bread. You can't taste the zucchini, so I don't really understand why it's added. My sister said zucchini bread came about to use up all the extra zucchini that people would grow (apparently it grows super easily). Either way, I decided to feature it here anyway because its good and it would be a good way to use extra zucchini, if you happen to have some lying around. I would rather use my leftover zucchini in a stir-fry next time. 


Changes to the recipe:
1. 1 1/2 cups diabetic sugar (instead of 1 3/4 cup normal sugar). 
2. 1/2 whole wheat flour, 1/2 normal flour (instead of all white). 
3. I also added 1/2 cup chopped walnuts.

Saturday, August 13, 2011

Broccoli and Red Pepper Salad

Broccoli is one of my favorite vegetables, though I don't discriminate. I love them all! Not only is it delicious, but it's also super healthy. 
* If steamed, it can lower your cholesterol
* It also has detoxifying properties. 
* It has Vitamin A and Vitamin K in it, and may even help you rebuild Vitamin D
* It is high in flavonoids and lessens the impact of allergy-related substances on our bodies. 


The colors give it a Christmas feel! 
So for these reasons and more, you really should try to make broccoli a part of your diet. Another great thing about broccoli is that you can enjoy it steamed, which is the healthiest way. A lot of vegetables don't taste so great steamed. For example, I hate steamed brussels sprouts but adore them roasted. Steaming helps retain the vitamins and minerals in the vegetable and usually means we have a healthier dish on our hands as it hasn't been doused in oil. 


This cold salad doesn't really involve any cooking, just assembling. All the better for the summer! 


Ingredients:
1 lb broccoli
1/2 jar roasted red bell peppers
handful roasted almonds 
basic vinaigrette dressing*


*My basic vinaigrette includes equal amounts lemon juice and olive oil, a teaspoon mustard, a splash of balsamic vinegar, 2 minced garlic cloves, salt and pepper. But use any variation you like. 


Directions: Steam the broccoli until cooked but still crisp. The stem should make a snapping sound when broken in half and should be bright green. You don't want to oversteam the broccoli as mushy broccoli is gross. It should only take like 8 minutes. Slice the broccoli, roasted red bell peppers and almonds and add all to a mixing bowl. Dress the salad with your homemade vinaigrette dressing. Allow salad to sit for a bit before serving (the broccoli will absorb the flavors better). 


I served this with a side of quinoa and a mug of soup. A super easy, super delicious summer dinner. 

Friday, August 12, 2011

How to: Roast Red Bell Peppers

Roasted red bell peppers are delicious and super easy to make. You should really incorporate them in more dishes. I say this, because I was always too lazy to roast them myself, and would buy the store versions. But as most things are, they are much better when made at home. 
There's not much to roasting them. There's only one part that is awfully annoying and that's peeling those suckers. 


So here goes: 
Step 1: Wash them and place them on a baking sheet lined with aluminum foil or parchment paper. Bake them in a preheated oven at 400 degrees F. 


Step 2: Keep rotating them throughout and allow them to get sufficiently blackened and deflated. This should take about an hour. 


Step 3:
Once they have cooled down a bit, peel the skins off them. This takes some patience. Go slowly if you don't want to lose half the pepper. 


That's it! Slice them up, soak them in a vinaigrette or store in the fridge in some olive oil, whichever you prefer. They go great with everything- a few pieces sliced on a sandwich, added to a breakfast omelet, or tossed in a cold pasta salad. You'll find loads of ways to use them and they're healthy as well. Now that wasn't so hard, was it? 

Sunday, August 7, 2011

Easy Red Bell Pepper Soup

I've already spoken to my obsession with soup. It's easy. It's delicious and it gets better the longer it stays in the fridge


I ordered groceries online the other day and accidentally ordered three times as many red peppers as I meant to (I still struggle with kilos and grams here in Istanbul). I knew I needed to use them up as there was no way we could eat all of them raw, even though sliced red peppers are one of my favorite snacks


I figured a soup would be a nice way to use them all and Smitten Kitchen once again had a recipe for me. Deb never fails me! If you haven't checked out her site yet, smittenkitchen.com, you must do so asap. It's really stunning. I used this recipe and the only change I made was to use only 1 garlic clove because one of my roommates is allergic. 


This was the easiest recipe ever and turned out lovely. Really hit the spot and was filling as well. Keep in mind that you may strain this if you want your soup smoother, but that would remove all the fiber, so I would recommend leaving as is. 

Thursday, August 4, 2011

Oatmeal Cookies 2 Ways

Even though I've been struggling with a nasty bout of the stomach flu, I still wanted to get some recipes up for you guys. I'm heading south tomorrow and know I won't be able to post as often. 
Make sure to use a cooling rack. 
Last week I attended a barbecue and was asked to make a dessert. I originally wanted to make cupcakes, but then my sister reminded me that the frosting would probably melt in the insanely hot weather we've been suffering from lately. I figured cookies would be easy to transport and delicious despite the 100 degree weather. 

I wanted to make oatmeal cookies with a kick. So I adapted this recipe from Smitten Kitchen. 

I made two batches. The first batch had dark chocolate (1/2 cup) and raisins (1/4 cup), while the second batch had white chocolate (1/2 cup), cranberries (1/4 cup) and a handful of pecans. Other than that, I followed the recipe to a T. (I also made a batch of sugar-free cookies using diabetic sugar, and despite the fact that my boyfriend liked them, I don't recommend using diabetic sugar. They didn't brown as much as they do with brown sugar. Duh.) 

Moist and yummy. 
Be careful with the cooking time here. Mine only took 8 minutes to bake, while Deb on Smitten Kitchen said hers took 10 to 12 minutes. It really varies depending on how big or small your cookies are. Take them out when they are light brown around the edges but still soft in the center

I thought the white chocolate cranberry cookies were to die for, and I don't even like white chocolate that much. Try both and let me know what you think. 

Monday, August 1, 2011

Zucchini and Spinach Soup

I had some zucchini in the fridge and didn't feel like sauteeing it, which is what I usually do. And weirdly enough, I actually love soup in the summer. I like that soup is light and fills you up without making you feel bloated. I tend to stay away from heavier foods in the summer, so I decided to make a zucchini spinach soup inspired by this recipe on 101cookbooks. 


Changes I made to the recipe:
1. I didn't have any potatoes on hand, so I left them out, instead using half an avocado to achieve some creaminess. Next time I'll make sure to use at least one potato, because it wasn't as creamy as I'd have liked. 
2. I used twice as many zucchini, just because I had them on hand. 
3. I didn't use any cilantro. 
4. I added a little cumin and some red pepper flakes, to spice it up a bit. 
5. I used only 1 tablespoon olive oil instead of 3. 


I haven't had this yet; will do so tonight and report back. It's super duper healthy, so you don't have to feel bad eating it. Finally, remember that eating soup fills you up without you having taken in too many calories (unless you consume a cream-based version), so it's a great choice if you're trying to get in shape. 

My awesome followers!